Week 8

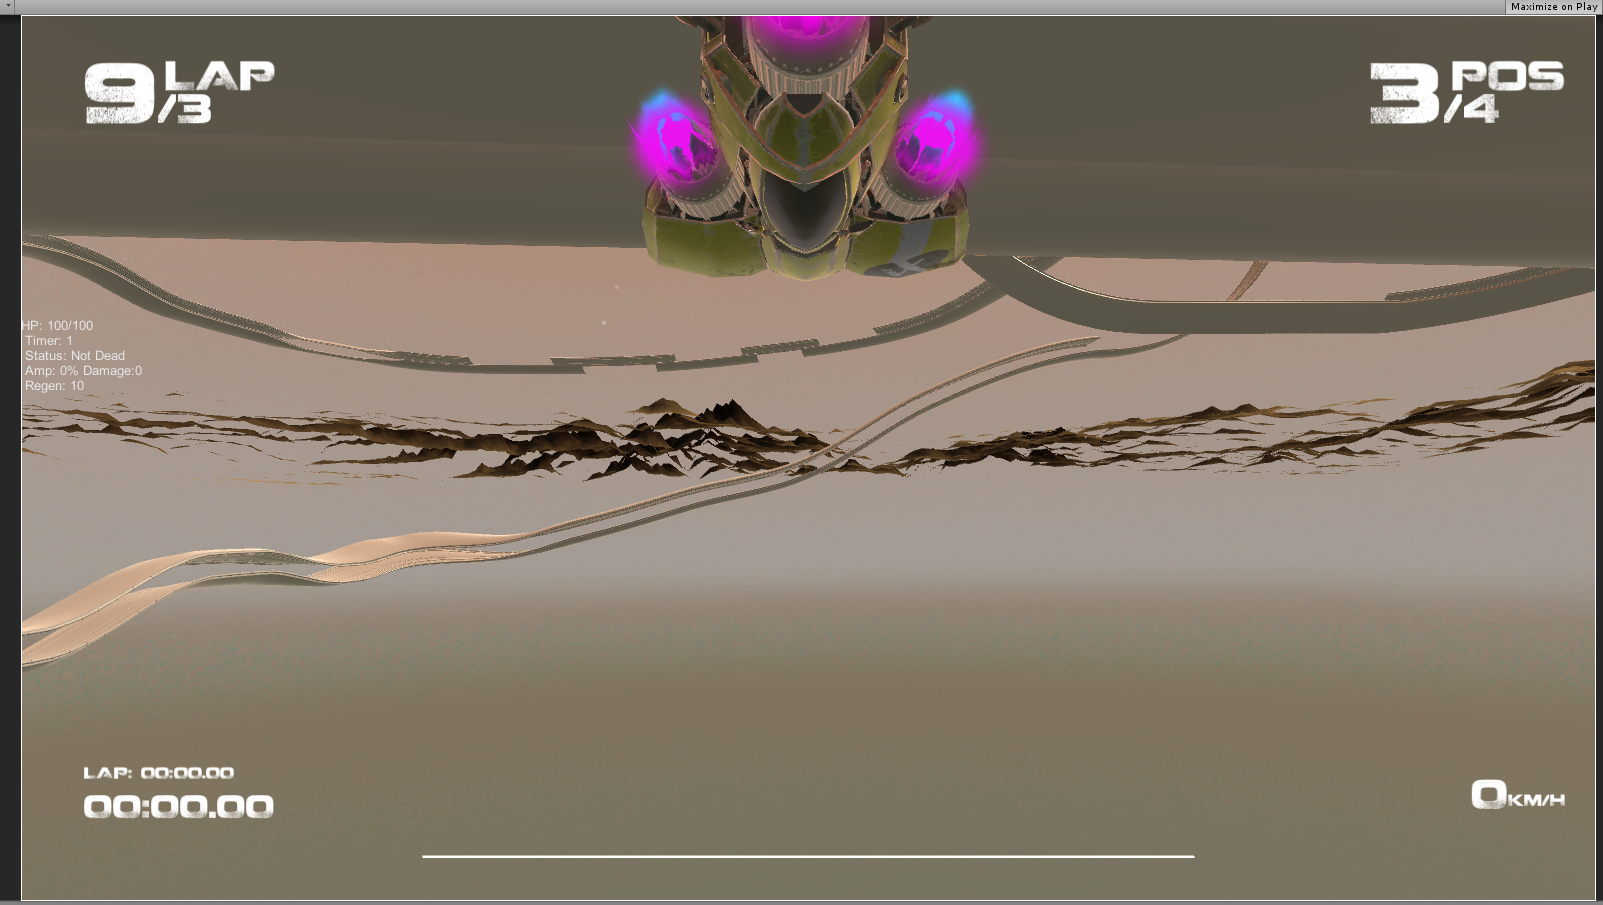
So, this was the last week of production and a lot of things have happened. But to begin with, here is the second track of the game, the Rumble Eight.

Week 8 Bild 1This track is a lot smaller than the other, ”main track”. While the large one takes around 45 seconds (best time) – 1 minute and 30 seconds (average beginner time) per lap, this one lands at around 15 seconds (best time) – 30 seconds (average beginner time).

Week 8 Bild 2The track overlaps itself in the middle of it, originally the tracks weren’t meant to pas above/below eachother, but rather, continue through eachother. This turned out to be too difficult and since we were pressured for time this week, this is what I went with. The clamps are also present in this level and there are only two holes in the track. Since the track itself is so short, two holes was the optimal number in order to not overflow the track with them.

Week 8 Bild 3Same with the boosters,  given the small amount of track space I had to work with along with how curvy the track is, the amount of boosters that a player can get in one lap around the track are 2. Since the boosters are most efficient when chained together however, the boosters stats need to be different on this track in order to matter. The time that the booster ”buff” lasts is slightly longer and the power is greater than on the other track.


This all seemed really well, until a certain issue we had had in the game was resolved. We had had issues with a stuttering of the ships, almost like lag except that there was no drop in FPS. When this issue was fixed, the speed of the ship as well as the power of the boosters changed drastically. Before, taking all the boosters in the loop (around 11 of them) would present a challenge in controlling the speed, but it was far from impossible. After the fix, taking three boosters would send the player flying off the track with no hope of controlling the speed.

The result was that the player speed and booster speed all needed to be changed and time was an issue at this point. I spent the last few hours of the project trying to re-balance the speed of things again. The player speed was easily fixed, the boosters on the old track were also fixed to the point that it felt like it previously had.

The boosters on the new track however, never reached the same sweet spot again, this was a mistake that I had made, when I was driving around the track, the boosters power felt fine. When we presented the game at GGC however, it became very clear that they were still far too powerful. The boosters sent the players flying off the track the first time that they grabbed it and for the rest of the race, they avoided them. Halfway through all this, the boosters were revamped and fixed to the point where they were acceptable again.

This only happened because I was too comfortable with the game and our controls and as a result I balanced them in a way that was unfair to newer players. How unfortunate that this mistake was made in such an untimely manner.


Week 7

So this week has been all about balancing the level with booster placements further and in general finishing the level up.

Week 7 bild 1This is how the level is going to look in the build for GGC. Supporting pillars have been added to explain how the track is kept afloat. In the area under the loop in the back, there is a ring that surrounds the tracks, this ring represents the start and goal of the track.

Week 7 Bild 2We have also added in these ”clamps” around the tracks. These are partially meant to explain how the track is kept together without needing to add in pillars that support both tracks. From a gameplay perspective, their purpose is to warn the players of an incoming swap that the player needs to preform due to holes in the tracks.

Week 7 Bild 4The boosters have been tweaked in power, placement and visibility. The power was difficult to tweak, since I have played with a setting for a prolonged time and have had time to adapt to it. The placement was changed mainly in the loop, making them easier to pick up but also easier to avoid if the players felt that the speed was too much to handle.
The visibility was also changed since their glow used to be so weak that they were barely visible.


Having gotten the feedback that the level is too big and removes too much of the ”player versus player” element, the group has decided to add in one more level, a level that is smaller in lap size and larger in width of the track itself, this should place players closer to one another and therefore encourage ”competition”. With this said, the larger level is still going to remain in game, but is going to be more focused on a ”time trial” type of gameplay.


Week 6

This week has not been all that different from the previous weeks. Last weeks post included a picture of a track that I explained was going to be scrapped/remade.
So, this week I have remade the track, welded it together, matched the collision track and tested the level.

Blogg The track 5 Blogg The track 4 Blogg The track 3 Blogg The track 2 Blogg The track 1

These are screenshots of the track as it is in engine when I tested it. Some issues were encountered with the spiral and the sloped curves as the ship started pulling back and forth, we suspected this would because of the collision plane. As a result I have recently remade the collision track with 2-3 times more geometry and the curved tracks were also remade with more geometry to make the curves smoother. The ”remade” version has not yet been put into and tested in unity, that is, however the next step.

In these pictures, part of the track is below the ground, this was done for testing purposes to see how high up the loop is going to reach. The idea with the lower area that is currently under the ground, is to have it drop into a pit which will be filled with trash, giving more variety to the scenery.

As uninteresting as it may be, here is a look at the remade version in 3dsmax since it’s the only way for me to show it:

Blogg The track 6

The curves and slopes have been changed slightly to make them smoother to drive across, hopefully this will also translate when I test it out in the game.

The idea behind the slopes is to shield the players vision from the horizon in some parts of the track. Just seeing a straight line start to end looks dull, just adding some slopes to a straight area makes it feel like there is more going on in the track then there actually is. The slopes also make the swapping mechanic more important, in a downward slope, the upper track will give the player better vision of whats to come, and the opposite applies in an upward slope.


One lap around the track with no boosters/obstacles placed out took 1 minute and 30 seconds, which is a decent enough time that allows for 2-3 laps around the track. I will probably add more gaps in the tracks as well to force the players to swap between the tracks more frequently.


Week 5

Unfortunately, I don’t have a lot to show for week fives late post. I spent the better half of the week at home after having been food poisoned.

I continued modelling some environment but instead of putting up a picture of that this week as well, I’m going to put up a screenshot of the work I did today (Monday).


Track Blogg


This would  be the start of how the level is being built. The blue, yellow, green, red and teal lines that run through the tracks are splines. When those are put out, I use the ”track” mesh and path deform it onto the splines. Matching these up, adding the right amount of track chunks and re-scaling them to fit the track and to match the previous segment is a bit fidgety and therefore, time consuming. While building this version of the track though, some issues occurred in specific areas of the track. The yellow spline is supposed to be twisted 360 degrees, when doing this on too short of a distance though, certain areas of the chunks clip through itself. In order to create a twist that doesn’t have those issues, the track needs to be as long as the entire blue segment (the second longest segment of the track), which is far too long. The red spline ”drop” is steep in a way that makes the track chunks connections too sharp.

As a result, this track is, unfortunately, going to be scrapped/rebuilt and the track chunks are being rebuilt to be easier to manipulate and to fit the track better (hopefully with a lower tri-count as well).

And that is going to be it for week fives post. Hopefully I won’t get sick anymore before GGC.

Big Game Project Week 4

This week was the week where I was originally supposed to start building the level but due to complications with the programming of the splines, there was a change of plans.
Instead for this week I have been modelling some environmental assets. Partially some assets that I were supposed to have created last week but never got around to doing due to changes in what I had to work with.
I have also created a testable level, the prototypes that were created were never supposed to be in the game and therefore they were modeled in an ”unusable” way.

So to begin with, the rocks I created. I created about 5 different stones, two of which were decent with a usable polycount, the other three were tests I made to see what way gave the better results.

Stenar Blogg


The boulder looking stone to the left is not yet completed, the texture was merely placed there as a test. To the right we have two models, one High poly and one Low poly. That is the stone we decided to go with, it has both a normal map and an ambient occlusion map baked and only needs a diffuse map & roughness.


Hus blogg


These models are the houses I created this week. No texture work is done for them, but the modelling is completed, during the coming week however, more details might be added (might model in doors and windows) and some of the scales for the left building is going to be reconsidered. These buildings are going to be somewhat destroyed, this will come through mainly in the textures. Other assets might also be placed in and around the buildings to reinforce how broken they look.


test level blogg


This is the test level that I created in order to give the programmers a chance to test cameras/gravity/swapping in the game. The problematic areas so far with the level are: the spiral, the area with half tracks in the bottom left and the loop. The loop has the mildest version of problems and the spiral is extremely hard to pass through.


And that is about it for this week, the playtesting took some time away from the friday and as a result, the friday was probably the least productive day of the week.


Weeks 2 and 3 of Big game project

I’m mashing these two weeks into one post since the first official two weeks that I’ve been with the group are coming to a close.

Week 2

This was the first week that I spent with the group, during this time there was a lot of writing/documenting with the game design document and some trouble with offices.

The office troubles consisted of us getting placed in a ”common area”, the group saw problems with this since we would not be able to discuss as freely between each other, this was obvious during the entire day that we spent sharing the room with another group. The problems were quickly resolved and the group got a new office space, this was, however, time consuming as we had to change the rooms furnishing around to be able to fit all six of us in one room.
While these are minor issues, they still mattered, since if we had not been able to fit all the group in one room, communications would suffer somewhat.

While trying to find our group an office, the group was also working on the design document as well as having partially started production.

As the groups level designer, I also spent a lot of time reading about tracks/levels in racing games. I also searched for ”similar” games and played through two of them in my spare time. This was done in an attempt to further my understanding of the genre and how I could build levels for the game.

I created a really bad looking prototype during the first week, which I could not find right now, but it still helped me to get ideas on how the level could look with the help of feedback from group members.

In the end though, most of my time was spent helping out with the design document.


Week 3

During this week, we still had some work to be done with the design document and about halfway through the week, the group decided to put the info from the document in to a wiki page. The producer did the ground work, starting up the wiki and moving some information over, but soon after, he needed to move back to programming.
At that point I started moving all the remaining information over and during Wednesday everything had been moved.


The new prototype that I worked on this week came out looking far better and more thought out, it contained most of the ideas from the original prototype, added to it and I made sure to keep the games core mechanics more in mind.

blogg levelWell, for some reason the resolution of this picture became awful. I’m going to try to explain what the different, barely visible, numbers mean. they run around the track so try to follow my explanation anyways!

1. (top left corner) This is the start/finish of the track, nothing that notable, other than the double tracks which run throughout the entire level.

2. (below 1. to the left) A steep slope with a track running down the middle, this track will be possible to swap to both when running down the slope and when running up it on the other side. A track is hovering slightly above the upward slope, making a skilled ”Swap skip” possible.

3. (continue down) a set of the double tracks with gaps, forcing the player to swap swiftly between the tracks to move forward without falling off the stage.

4. (to the right where the tracks are separated in a large curve) A punishing section for the players who did not swap tracks in time, the player needs to make sure that they are on the most profitable track at all times.

5. (the messy area above and to the right before the cylinder) A twirl of tracks, changing the upper track to the lower and lower track to the upper.

6. (the cylinder) A tunnel section where the player would be able to move up on all the walls and swap freely.

7. (the track moving on towards the middle) Exiting the tunnel the player is given a slight scare when the track disappears before the vehicle, but due to gravity, the player is only swung around, leading in to the section that is consisting of smooth curves running up towards the loop.

8. The loop, the final area before going in to the finishing line.
This is obviously not a final version and more iterations will probably come out and there are things missing from the prototype, such as booster placement, track event triggers and usables.


After posting this, I will also return to trying to model rocks for the environment.


3D week 8

For this week, we scanned photographs and created 3D models of faces, from pictures of faces.
We were given the opportunity to work with our own faces and to create 3D models of our selves, this was something I agreed on doing. We took something around maybe 10 pictures from different angles and were then supposed to use Autodesk 123D Catch to create the mesh of our faces. Unfortunately, this proved to be difficult to do with the limited amount of knowledge of the software and the limited amount of time to do it in.
So in the end I had to use someone else’s face. When doing this we were supposed to redo the topology of the mesh, we did this by using 3D coat.

Face topo

Unfortunately, most of the work I did was centered around the eye socket and I got no further than this. The reason why was because I actually recreated the topology around the eyes 3 times. This was because of the first 2 times ending up weird and ultimately unusable. The main issue I had actually came from a poor understanding of the way that edge loops worked and their importance when modelling something organic. So most of what I did was centered around getting a better understanding of the edge loops and in the end I got about as far that I was just about to start breaking the loops and start with the rest of the face and connecting the eye geometry.


When I read about ”The vanishing of Ethan Carter” nothing of what they did really surprised me. The reason was because all of what they had done with their photo realistic models was already something that I understood to be possible when we first started dabbling in it.
This is not to say that I’m claiming that I would be able to do something similar, it was just obvious to me that it would be possible. The first thing I started thinking about when we started with this was ”how big could I go?” and considering that the requirement is to be able to take photos all around the object, then houses and such seemed very possible.
What is impressive however, is that they appear to have done it so much, and considering how time consuming  it must have been. The whole idea of using this method to create meshes is very interesting to me and it is something that I would like to explore further, although, I’m not sure I would take the risk of trying to create a game with it as a base tool. I would probably just use it to experiment and to see what I could do with it.

Part 2: assignment 3 update 

This is what the finished mesh for assignment 3 looks like!

Alien finnished meshAlien finished mesh 2Alien finished mesh 3alien finished mesh 4


The tricount I reached was 2900 which I am quiet satisfied with since the goal was 3000. I’m feeling satisfied with the work so far, hopefully I wont have as much trouble with the texture this time around!


3D week 7

For this week we were supposed to bring some of our 2D drawings to try and see how well we knew our anatomy. Naturally this meant that we were supposed to bring examples of our character drawings, not environment drawings.

So this is the character that I got the most feedback on:

SimonBrundin_lineart_Kompletering

(Once again, the resolution of the image appears to be bad, sorry)

So the major part of the feedback that I got from the people who looked at it was regarding the way I angled the character. The shoulders are twisting in a strange way in comparison to the lower body. This was something I was aware of from the 2D course we took. It is worth noting that this is the ”best” I’ve achieved and I don’t think this is a lack of knowledge regarding the anatomy of the human body, but rather an issue I have with illustrating things in 2D drawings. The length of the body/legs/arms appeared to be correct though, even if the area where the legs start is hard to define. This is because of the chainmail that is hanging over that area of the body.

The main issues I might have with anatomy is the way the faces are built and just looking at this picture, it is obvious that I spent a lot more time on the arm than on most of the rest of the body. The issue with creating bodies that can do things that a regular body can (in other words, not bending in a way that would be impossible for humans) is something that I can easily work on and get better at. What I would need to do is simply try and make the poses myself to try and see what my body is capable of, this of course, along with a lot of training.
The issue regarding the anatomy of faces however is going to be far more tricky. This is something I have realized when working with both 2D art and 3D modelling. In 2D and 3D I have a much easier time drawing/constructing objects than I have with characters. What I have realized with the help of the art courses since I started studying was that I have a hard time imagining a face. I do not know the reason behind this, but to try and explain this in a more understandable way: When spending time with someone I know really well (friend or family), if I close my eyes and try to envision their faces that does not present any trouble for me. However, if I were to leave them for around 30-60 minutes, that’s when trying to recall their faces begin to give me trouble. When imagining objects however, I do not appear to have the same problem. This is something I have tried working on but the only solution I have come up with really, is just a need to study faces and try to get a better hang of what a face ”usually” looks like.

That whole segment became hard to explain! But hopefully it is somewhat understandable.

Part 2: Assignment 3 update

So given what I was just talking about as well! Here is the update on what the character (work in progress) looks like.

Alien WPI

In this picture, the model is still in the middle of stitching the arm to the shoulder, I’m hoping to be able to add more details to the arm in order to make it look more organic, but this all depends on the polybudget and how much I am going to have left when I’ve finished the details on the gasmask as well.

3D week 6

Part 1:

Monster_Concept_Art_XII_by_D_faulTx

This is the character that I wanted my ”client” to model for me (note that this is not my drawing, this is a concept I found online and it is not going to be used in any way except for educational purposes). The character background I wrote down for the character goes something along these lines:
She is a mummy who died at a very early age, that was in training to become a priestess when she grew up. She was later ”sacrificed” because the priests were afraid of her developing clairvoyance.
Soon after her mummification she returned to walk the earth again.
The character herself has lost most of her humane parts, she does not ”care” if she has to hurt a human (which she does occasionally have to do), but she does prefer not to. Her main motivation, keeping her going is to figure out the meaning of ”life” and to unveil the mysteries of the world. The main ”evil” act she commits is when she steals an eye from a human in order to keep her vision, she is however, kind enough to only steal one eye from any given person. this is

The game itself is a puzzle game, where you play as ”Lady”, the nameless mummy. The game is set in a variation of the real world, in present time. The ”varitation” comes in the form of a slightly more mysterious world, where nothing is impossible. ”Lady” has over the span of her lifetime, found out a lot of things about the workings of religions, miracles and the supernatural. These are the kinds of things you search for in the game as well. The world is mainly inhabited by humans, with a very restricted amount of supernatural creatures and with ”Lady” being the only one of her kind. There have been known sightings of Vampires as well (among other things).

Her own religion has lost meaning at this point, but her upbringing as a priestess and the rituals that were included in that education, still weighs heavily on her personality. There are plenty of reasons why she has lost faith in her old religion, among those are the fact that she has investigated all religions, both present and past, during her lifetime. In this research she has found that the miracles connected to religions, and certain parts of all religious texts, have elements of ”truth” in them. This has lead her to believe that there is no ”god”, rather that what humans create can become reality, depending on their own faith in it. In other words, she has reached the conclusion that all things living are, in a way, divine.

Other relevant information regarding the game include that it would be primarily a console game, the camera perspective would be third person. Since it’s mainly a puzzle game, ”rivaling” games would be games like Portal or Antichamber. The game would, however differ from those two titles in aesthetic, perspective and setting.


Part 2:

Quick update on the second assignment! This is what the dagger is looking like now!

Kniven

And since I sort of missed out on the update with the UV last week, here’s what the dagger looks like with the UV checker as well:

UV checkerdagger

(Excuse the resolution, I don’t really know what’s going on with it).

And here is the UV map:

Dagger UV map blogg

While the UV map has a lot of empty space, there is really nothing I can do to fill it in at the moment, if I were to enlarge the parts more, the blade would stick out of the picture.


Part 3:

progress_slig01-01Slig RAAE0048

This is the character that I’ve been given to make a 3D model of, the main thing to take note of is that I won’t be modelling the robot parts of the creature. Instead the model is going to look something like this:

Omo-slig-concept2

The only non-organic part to be modeled is the gas mask. The creature is called a ”Slig” and is from a world called ”Oddworld”. The creature with all of it’s lore is taken from the game with the same name as the planet ”Oddworld”.

The slig is a disgusting, malevolent creature, that was just recently discovered to possess any kind of intelligence.
They are squid like humanoids that work as henchmen and bodyguards for the “Glukkon Industrialists”. They are supposed to be lazy, violent, cruel and dull minded. In spite of this, they are social beings that enjoy gambling, sports, card games and hunting.
The slig that I will be modelling is around 15 years old, given their lifespan of around 20 years this would be considered “old” (taken into consideration that the years on Oddworld are longer than our earth years).

The parts of the model that could potentially be difficult are for starters the arms. They will consume a large portion of the polycount budget we have been given since the fingers will be modelled individually. Worth noting is that the middle finger is far shorter than the two fingers next to it.
Another thing worth noting is that the proportions in the concept art varies between the pictures. The “tail” on the side view is longer than it is in the front view. Same goes for the top of the slig (the area that would be the spine), it’s locations and proportions are different depending on what view of the concept art you are looking at.
The gasmask might become difficult as well, being uncertain of the amount of polygons that will be consumed on the body as a whole.
The tentacles sticking out from the front of the gasmask might be easy to model and put into place, however, these might also be consuming a lot of the polycount in order to make them look round and organic.

3D week 5

Right! It’s been a stressful week after Dreamhack, but I think I’m finally beginning to catch up again! So here we have the final version of the crate with the Diffuse map, Specular map and Normal map included.

Final crate blog1 Final crate blog2 Final crate blog3

And here is the crate without normal map or specular map for comparison!

Crate textured Diffuse

So what are the main differences with and without normal and specular maps? Well, firstly the normal map adds more depth to certain areas, the darker areas. this helps this particular crate in separating the individual planks a lot more. Originally it was more obvious that those were just black lines, but now it looks a bit more like a space in between the planks. It also adds a tad bit of that same depth to the spotted areas in the wood. This is only a optical illusion though, and if the crate were to be in a game and the player looked at it from certain angles, it would be obvious that the surface is flat. That’s why it’s important to consider the ”role” of the item before leaving everything up to the normal map. For an example, if this wasn’t a crate but rather a weapon in an FPS game, leaving too much up to Normal maps would be hurtful because the player will always be closely inspecting that weapon.

What the specular map has added is ”Shine” to the object. This is clearly vissible in the inner parts of the crate on picture one and 2 and is very visible on the entire left side of picture 3. The specular map is important since it is the main thing that will help the object reflect light. If you look at the ”original” picture (picture number 4) that has no specular map, it isn’t reflecting any light what so ever, this would probably make the crate look out of place and strange if it was put into a game.

The diffuse map is simply the texture itself, it’s where the object gets all of it’s color and details. Without the diffuse map, the crate would be far harder to recognize as a crate.
Without the diffuse, leaving only the normal map and specular map the crate would look something like this:

Crate blog example 1 (on this picture the work that the normal map does is more obvious as well)

And without any of the maps the crate would look something like this:

Crate blog example 2


So to summarize: The diffuse map adds in color and details. The normal map adds in ”bumps” and gives certain areas more depth and enhances the details on the object. The specular map adds in the shine of the object and can help define the edges and help identify materials in objects (a screw for an example is shinier than wood).


And here’s how the three different maps look:

Diffuse map
Difuse Crate UVtextured

Normal map
Crate Normal map rescaled
This picture clearly shows the details added to the black lines when rendered with the normal map included. The darker areas from the specular map become ”bumps”.

Specular map
Specular crate rescaled

The lighter areas in the specular map reflect more light than the darker areas.


Well, that’s it for this weeks blog post!